Are you tempted to give your pooch a pedicure, give his nails a trim? Maybe because you want to save some money, or it’s simply more convenient for you, or you just don’t want your pooch to have the stress of a visit to the groomer. These are all good reasons. Grooming your pet can also be a great way to bond with your pet, but at the same time it’s not as easy as it looks and it can also be time consuming – so if you are planning to give your pet a pedicure for the first time, it’s good to be prepared.
Why do dog’s need nail trimming?
It doesn’t apply to all dogs, as some dogs have natural nail trimming going on if they have a very active lifestyle outdoors. In these cases the rough surfaces can naturally wear out the nails, by giving them a gentle filing on each outing. But if a dog leads a more domesticated life their nails can grow very long and if left to their own devices they can become deformed because of their long length. When their nails are too long they can catch on fibres and be pulled off – which would be painful. Also it can hinder their grip on more slippery surfaces. So if you hear a tap tap tap when you dog walks on the floor, it is time for a trim!
If you decide to give it a go yourself, here are some simple tips to follow:
Get prepared – get the right equipment for the job
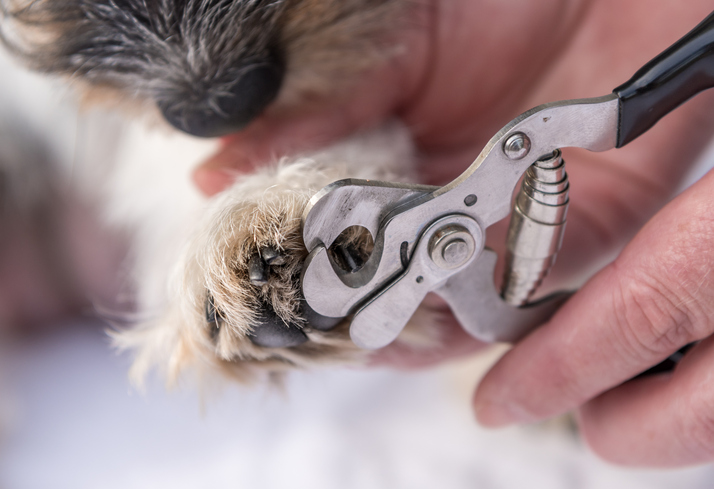
For starters, you need to arm yourself with the perfect nail trimmers that are specially designed for dog nails. It’s not a “one size fits all” situation. What you are looking for are sharp trimmers that are the correct size for your dog. If you have poor quality clippers, you will end up splitting your dog’s nail. It is hard to gain your dog’s trust after that. Some of the nail trimmer styles available are:
- Scissors style
- Guillotine style
- Small/medium pliers-style
- Large pliers style.
You will need to do some research or even enquire at your vet or the local groomers as to what is the most appropriate trimmers for your pooch. Our advice would be to get the best trimmers you can possibly afford, to enable you to do the best job possible.
Have a pair of scissors handy to trim away any hair so that you have a good line of sight on the job to be done.
Most important, arm yourself with some treats!
Calm your Dog
Before the pedicure, ensure that your dog is as relaxed as possible. If the dog is jumpy during the nail trim, you may end up making a bad cut and causing pain. To ensure that your dog is calm during the trim, you can try tiring them out with a long walk, playing or feeding them a heavy meal. If you have tried everything and your dog still won’t calm down, do not force the pedicure on them. Visit a vet and try to get some advice on the issue, or take them to a professional to get the job done.
Study The Nail
If this is your first attempt at a trimming your dog’s nails, then you probably haven’t seen what makes the dog’s nail. First off, you need to take the paw and look at each nail carefully. Look at where the toenail ends and the quick starts. The quick is usually pink (or lighter colour), and it’s the part that supplies blood to the toenail. You need to take extra care not to cut the quick. It’s a really sensitive part and bleeds quite easy. So be very mindful not to cut too close to the quick.
Trim the Nails Gently
Make sure that you are in a well-lit room or outside the house. Before you start you may need to clip away some of the hair around the nails (with scissors) so that you can see things better.
First get your pet in a sitting or lying down position. It works best when he is on your lap with the nails facing away from you. That way, you can see the nail and ensure that you are holding it steady.
Hold your pet’s paw and apply gentle pressure to the base of the nail to help move the nail away from the pad. The idea is to trim the tip of the nail where it curves around. It it important to avoid trimming the quick (the nail bed). This can be seen in a white nail, but not so easy with a black nail (see below for tip to find the quick on a black nail).
If you are unsure of where to trim your pet’s nails, then when you’re at the vet for a check up, ask your vet to show you.
Start trimming one nail at a time. If the nails are too long, you can file them first with a pumice stone or a dog nail file. After that, take a small trim off each end of the toenail. Do not put the entire nail in the clipper. After each cut, inspect the underside of the toenail. If you notice a small pink colour or feel that the nail is getting soft under the clippers, then you are close to the quick. Stop trimming. Repeat the trim until each nail has thinned. Remember not to squeeze the toes as you are trimming the nails. It can hurt the dog.
Don’t forget to trim the dew claws on the inside of each front and sometimes the back legs. These nails are easy to miss but are often the longest nails as they are not worn down from walking.
Senior Dogs and Deformed Nails
When a dog gets older, the nail gets elongated and so does the quick. Same case for deformed dog nails. The nails get super hard so that you will need sharper clippers for the pedicure. To soften the nail, you can soak the dog’s feet in warm water for about 15 minutes (if you can get your dog to co-operate with this!). Start trimming the nails that seem to be larger than usual or always scratching the floor. You will need to be patient and trim little bits of the tip as the quick is close-by. File the nails that are too thin to cut off. Your end goal is to ensure that all the nails are above the floor when the dog stands up.
Black Nails
If the nails are black, you can apply a simple pressure check to find the quick. Apply gentle pressure on the nails and watch if the dog squirms. If he seems fine, then you know that it is safe to cut. If that doesn’t work, check the underside of the nail. It is a triangular shape that has a pale grey colour on the other parts. The inner darker grey or black part is the quick.
What If The Nails Bleed?
You may accidentally cut the nail too short and cause it to bleed. Don’t panic! Simply get into first aid mode and plug a small piece of a bar of soap under the nail to stop the bleeding. If your dog seems nervous the next time you try to give him a pedicure, entice them with a treat before they settle in your laps. That always works.
While you’re there!
When you have your dog nicely relaxed it’s also a good time to check his or her pads under the feet. If there is a lot of hair growing it can also result in slipping an sliding on flat surfaces. So why not give the hair around the pads a bit of a trim too? Also check around the pads to make sure there’s nothing wedged in them. That can also be painful for a dog.
Finally give your dog a treat after you are done with the trimming on each foot (or even nail!) Rewarding them is a way of making it a positive experience and something that your dog will look forward to. Consistency is everything if you want your dog’s nails to be in perfect shape. Get ready for another pedicure session with your dog after a few weeks or if you start noticing deformed nails.
If you found the first session to be too hard for you, there is no shame in visiting a vet or a groomer for the next trimming. Maybe ask them if you can watch so that you can pick up some more tips before you give it another go. Remember practice makes perfect, and your vet will always be willing to give you a demonstration or trim your pet’s nails for you.
Do you have any trips about trimming your dog’s nails? Let us know!


Leave A Comment